All Your Base Are [Still] Belong To Us
Fuzzing Modern UDP Game Protocols With Snapshot-based Fuzzers
Axel ‘0vercl0k’ Souchet recently open-sourced a promising new snapshot-based fuzzer. In his own words: ”what the fuzz or wtf is a distributed, code-coverage guided, customizable, cross-platform snapshot-based fuzzer designed for attacking user and or kernel-mode targets running on Microsoft Windows.”
In this post we will walk through the process of creating a fuzzer module for what the fuzz, allowing us to fuzz the packet parsing code of a popular triple-A multiplayer game title enjoyed by millions of active players. Complemented by Tenet, we show how these two technologies can be used to discover and then analyze critical real-world vulnerabilities.
Fuzzing using what the fuzz, a snapshot-based fuzzer for Windows
Snapshot-based Fuzzers
Fuzzers have grown increasingly effective at finding software bugs. Snapshot-based fuzzers make up an advanced category of fuzzing which employ emulators (or other virtualization technologies) to efficiently and deterministically fuzz ‘hard to reach’ code while leveraging powerful introspection capabilities.
These types of fuzzers are typically seeded by a ‘snapshot’ captured from a live system (or VM) precisely before executing code that a researcher is interested in fuzzing. Snapshots often contain full system memory, CPU registers, or any runtime information necessary to faithfully resume execution in an emulated environment.
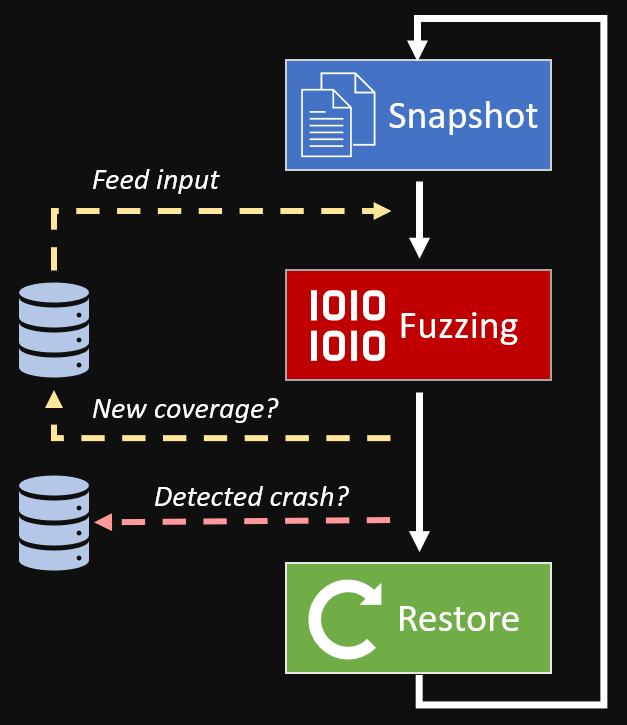
The typical flow of a snapshot-based, feedback-guided fuzzer
By managing its own full system emulator, the snapshot-based fuzzer can efficiently track ‘dirty’ pages of memory during execution, resetting memory and CPU registers to a ‘clean’ state (the snapshot) at any point.
To fuzz under this snapshot-based architecture, the fuzzer will inject a mangled testcase to the emulated system and begin executing forward. If the emulated system crashes, the fuzzer saves the current testcase to disk and resets the emulator for the next testcase.
Taking a Snapshot
For the remainder of this post, we will walk through the process of harnessing a retail PC game for what the fuzz such that we can perform snapshot-based fuzzing on its processing of incoming UDP game packets.
The first step is to identify a code location in the game binary that we would like to start fuzzing forward from. With some reversing, we identified a suitable location to collect a snapshot after the network-originating UDP packets are reassembled and decrypted for processing by the game client:

Identifying a point of interest that would be useful to snapshot, and fuzz forward from
By taking a snapshot of the system at the start of ProcessMessages(...), our fuzzer will be able to inject mangled packet data and begin executing forward into the 50+ message parsers called by this function.
Following the instructions included with what the fuzz, we use WinDbg on a Hyper-V VM configured for kernel debugging and a tight 4gb of RAM. After hitting our chosen breakpoint in the game process, we use bdump.js per the instructions to create a ‘snapshot’ of the system at this exact moment:
...
kd> !bdump "C:\\fuzz\\dump"
[bdump] creating dir...
[bdump] saving regs...
[bdump] register fixups...
[bdump] don't know how to get mxcsr_mask or fpop, setting to zero...
[bdump]
[bdump] don't know how to get avx registers, skipping...
[bdump]
[bdump] tr.base is not cannonical...
[bdump] old tr.base: 0x7fe30000
[bdump] new tr.base: 0xfffff8067fe30000
[bdump]
[bdump] setting flag 0x2000 on cs.attr...
[bdump] old cs.attr: 0x29b
[bdump] new cs.attr: 0x229b
[bdump]
[bdump] saving mem, get a coffee or have a smoke, this will probably take around 10-15 minutes...
[bdump] Creating C:\fuzz\dump\mem.dmp - Active kernel and user memory bitmap dump
[bdump] Collecting pages to write to the dump. This may take a while.
[bdump] 0% written.
[bdump] 5% written. 42 sec remaining.
[bdump] 10% written. 45 sec remaining.
- snip -
[bdump] 95% written. 2 sec remaining.
[bdump] Wrote 2.9 GB in 39 sec.
[bdump] The average transfer rate was 74.4 MB/s.
[bdump] Dump successfully written
[bdump] done!
@$bdump("C:\\fuzz\\dump")
Having collected a full system snapshot with the game sitting at the entry point of ProcessMessages(...), we no longer need the ‘live’ (Hyper-V guest) system. The actual fuzzing will take place ‘offline’ in an emulated environment managed by the snapshot-based fuzzer.
Snapshot Harnessing
The next step will be to create a fuzzer module (or harness) for our snapshot. In this context, a harness is the code that we must write to tell the fuzzer how to initialize our snapshot, where it should inject fuzzed testcases for each execution, and what types of events it can ignore while fuzzing.
We can start by making a copy of fuzzer_hevd.cc, an example harness that comes with the fuzzer. Working out of our own copy called fuzzer_game.cc, there are three main interfaces that will need to be filled in:
Init(Options, CpuState)– Perform any one-time mem/reg tweaks to the emulated system, define ‘goals’InsertTestcase(FuzzedData, Size)– Inject the generated testcase (FuzzedData) into the emulated systemRestore()– Restore any ‘external’ state implemented by the harness after executing each testcase
To implement the Init(...) interface for our harness, we first want to define a ‘stopping point’ for the fuzzer to halt execution and restore. Reaching the return instruction of ParseMessages(...) without crashing is a good place to stop execution as we assume the fuzzed message was handled ‘correctly’:
bool Init(const Options_t &Opts, const CpuState_t &CpuState) {

  // stop execution if we reach the ret instruction in ParseMessages(...)
  if (!g_Backend->SetBreakpoint(Gva_t(0x1401F66C5), [](Backend_t *Backend) {
          DebugPrint("Reached function end\n");
          Backend->Stop(Ok_t());
      }))
  {
    return false;
  }

  // Instrument the Windows user-mode exception dispatcher to catch access violations
  SetupUsermodeCrashDetectionHooks();

  return true;
}
This is important because we are only interested in fuzzing a small part of the game right now, the network message parsing routines. While it’s possible the game could crash later, we’re limiting our scope to start.
Next we must implement the InsertTestcase(...) interface for the fuzzing harness. This will be called prior to each execution and must be used to inject the fuzzed testcase provided by the fuzzer into the emulated system:
bool InsertTestcase(const uint8_t *Buffer, const size_t BufferSize) {

  // a 'bit buffer' struct we reverse engineered from the game executable
  bf_read buffer;

  // read the original network message bit buffer object from the snapshot memory
  if(!g_Backend->VirtReadStruct(Gva_t(g_Backend->Rdx()), &buffer)) {
    DebugPrint("Failed to read bitbuf during testcase injection!");
    return false;
  }

  // modify the network message bit buffer accordingly, for this fuzzed testcase
  buffer.m_nCurDword = 0;
  buffer.m_nNumBitsLeft = 0;
  buffer.m_nDataBytes = BufferSize;
  buffer.m_nDataBits = BufferSize * 8;
  buffer.m_pDataCur = buffer.m_pData;
  buffer.m_pDataEnd = buffer.m_pData + BufferSize;

  // write the modified bit buffer struct back into the snapshot
  if (!g_Backend->VirtWriteStruct(Gva_t(g_Backend->Rdx()), &buffer)) {
    DebugPrint("Failed to write modified bitbuf during testcase injection!");
    return false;
  }

  // inject the fuzzed message data into the snapshot for this execution
  if (!g_Backend->VirtWrite(Gva_t((uint64_t)buffer.m_pData), Buffer, BufferSize, true)) {
    DebugPrint("Failed to write next testcase!");
    return false;
  }

  return true;
}
Implementing these two harness functions is all that is required for our use case. After executing each fuzzed testcase, the fuzzer automatically will reset the CPU and any dirty pages of memory for us.
Finally, we build the fuzzer with build-release-msvc.bat under a VS Developer Command Prompt:
Rebuilding what the fuzz from source, using the provided build batch file
Running ‘what the fuzz’
To start fuzzing, we first must create a few folders as outlined in the usage section of the fuzzer’s readme. This hierarchy should be somewhat familiar to fuzzing enthusiasts:

Folder hierarchy required by the snapshot-based fuzzer
Of these folders, we must populate the following two:
/state– The snapshot files generated by WinDbg, i.e.mem.dmp,regs.json,symbol-store.json/inputs– Sample testcases for the fuzzer to mutate outwards from
Since I am fuzzing the game’s network message parser, I use dynamic binary instrumentation to sniff and dump messages that flow into our target ParseMessages(...) during normal gameplay. Providing ‘good’ testcases will naturally help the fuzzer achieve better coverage of the target.
For convenience, I created two .bat files to make it easier to start/configure the master (server) and fuzz (worker) nodes of the fuzzer. First we launch the master.bat to start the fuzzing server:
C:\fuzz\src\build\RelWithDebInfo\wtf.exe ^
    master ^
    --max_len 1024 ^
    --runs=10000000 ^
    --target C:\fuzz\targets\game
Then we can launch several of the client fuzz nodes:
C:\fuzz\src\build\RelWithDebInfo\wtf.exe ^
    fuzz ^
    --name GameFuzz ^
    --backend=bochscpu ^
    --max_len 1024 ^
    --limit 500000 ^
    --target C:\fuzz\targets\game
If everything is setup correctly, the fuzzer will begin to churn. For this job, I launched eight fuzz nodes (roughly one per CPU core) and let the fuzzer work its magic:
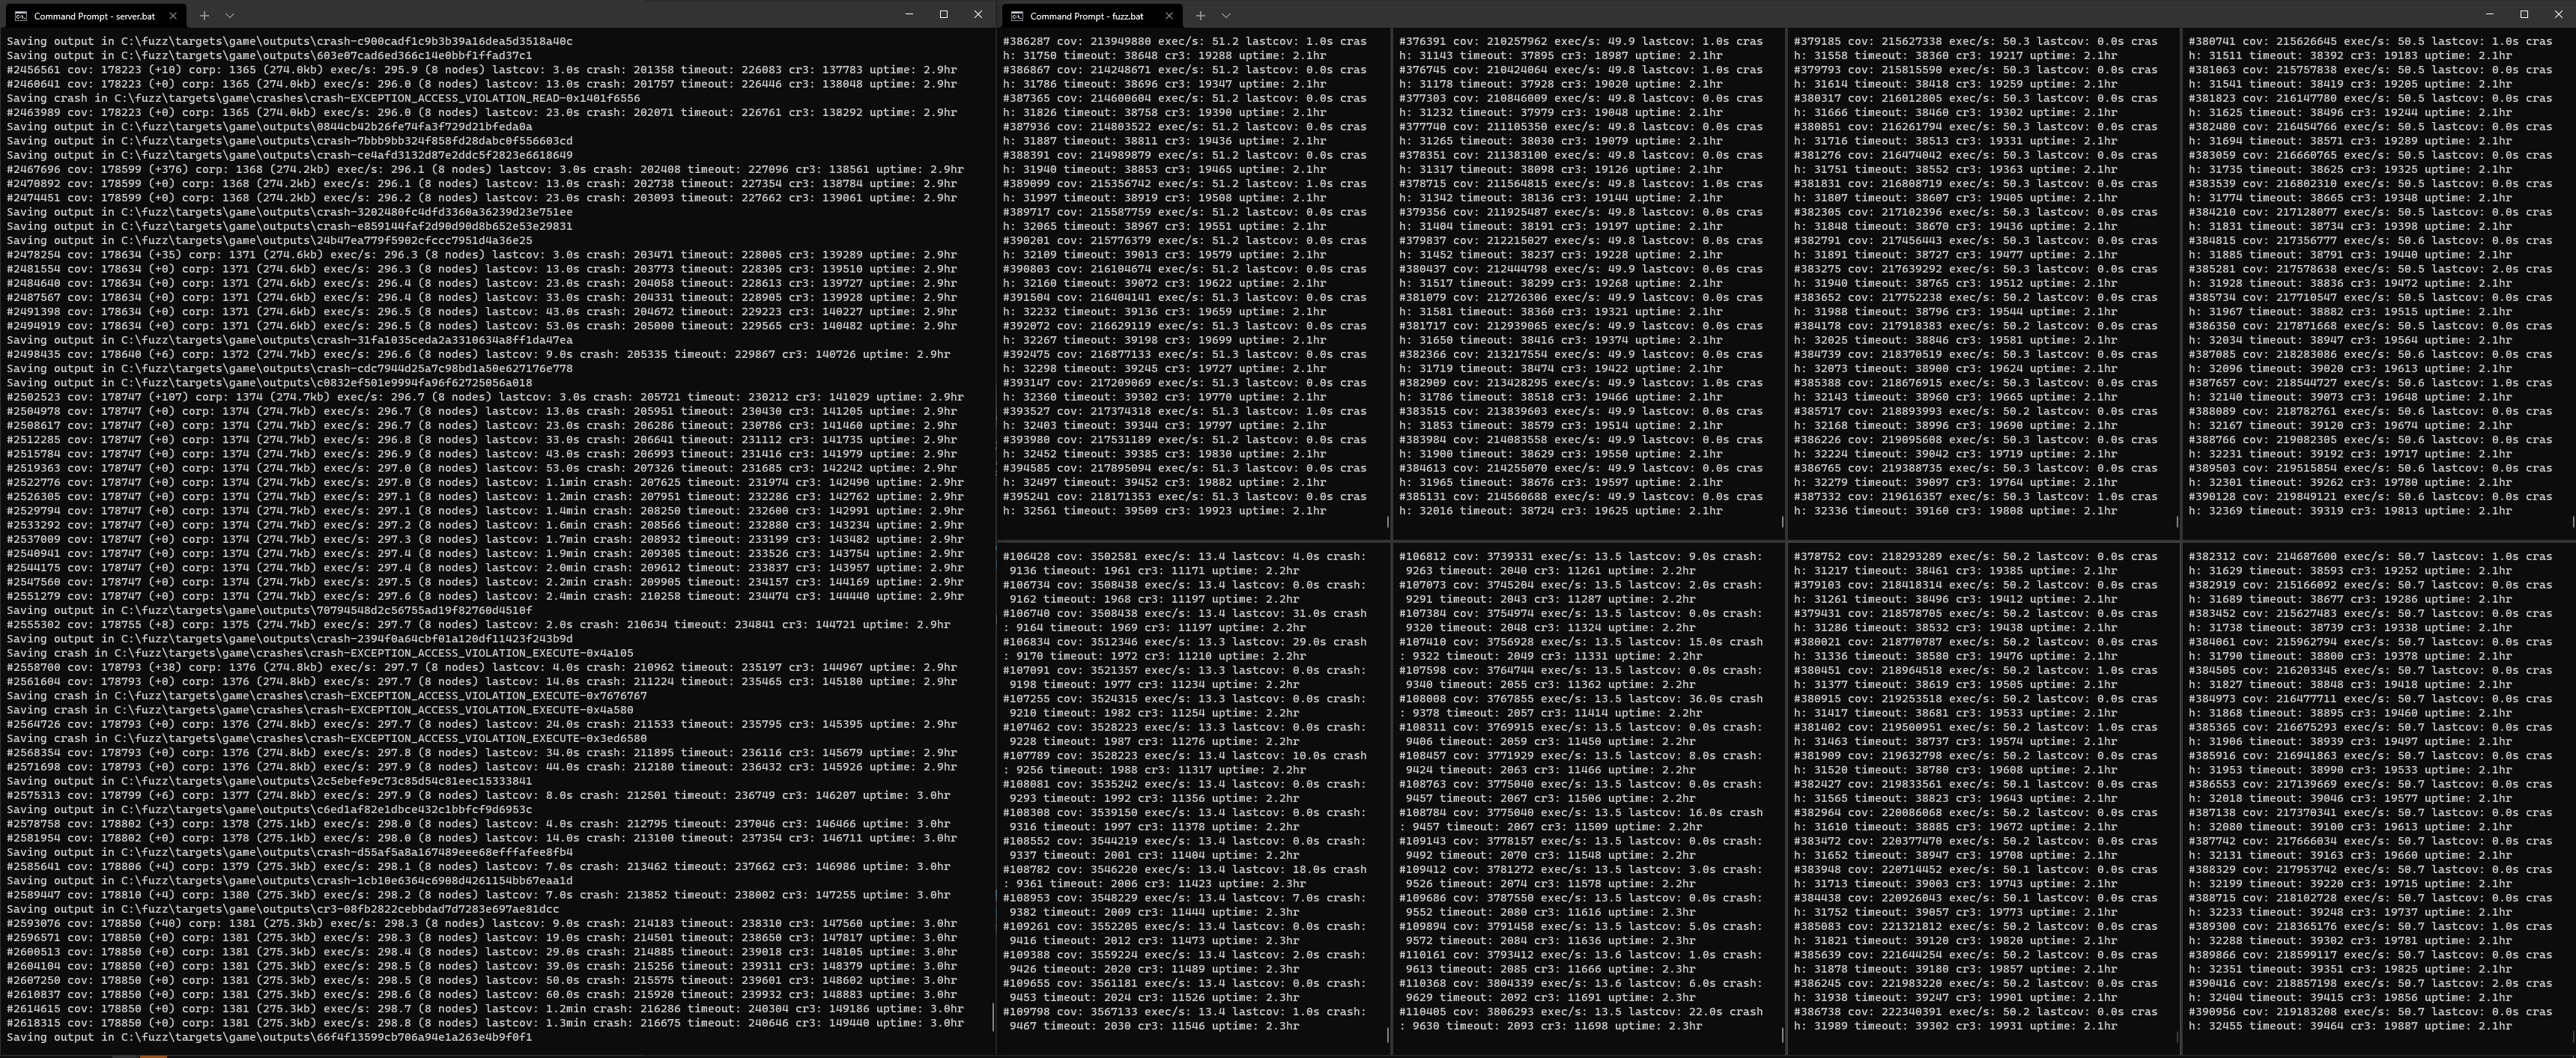
Fuzzing the target game with eight nodes under what the fuzz
As it runs, the fuzzer will save any testcases that produce new coverage to the output folder. Testcases that cause a unique crash will be copied to the crashes folder. After letting the fuzzer grind for three hours and watching its coverage % grow (coverage-guided fuzzing!) we can see that it has already produced several interesting crashes:
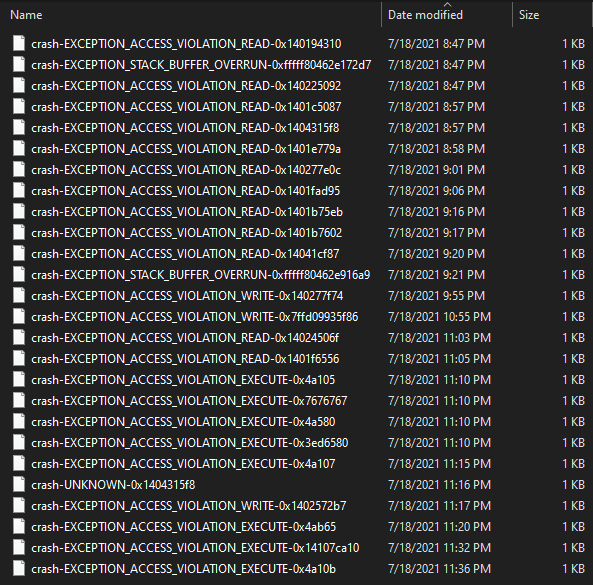
Crashes produced by the snapshot-based fuzzer over the course of three hours
Testing these malformed packets against the retail game would require extensive reverse-engineering of the game’s UDP network stack (packet encryption, decryption, fragmentation, reassembly, sequencing, etc) to send cleanly. It may also be difficult to debug the malformed packet flowing through the application under normal circumstances.
In the next section, we will demonstrate how we can use the fuzzer’s bochs backend to trace these crashes so that we can verify their impact and eliminate these cases from appearing in future fuzz jobs against this target.
Analyzing Crashes With Tenet
Evaluating crashes produced by snapshot-based fuzzers is a perfect use-case for Tenet. Tenet is a timeless trace explorer presented as a debugger-like experience in IDA Pro. Via pull request, I extended what the fuzz to produce Tenet traces using its built-in bochs backend.
Creating the following trace.bat file, we are able to generate Tenet traces of all the crashing inputs:
C:\fuzz\src\build\RelWithDebInfo\wtf.exe ^
  run ^
  --name GameFuzz ^
  --backend bochscpu ^
  --state "C:\fuzz\targets\game\state" ^
  --input "C:\fuzz\targets\game\crashes" ^
  --trace-path "C:\fuzz\targets\game\traces" ^
  --trace-type tenet
Using what the fuzz to generate Tenet traces for manual root cause analysis
There is a bit of a learning curve to Tenet’s navigation (okay, maybe a learning cliff) but once you become familiar with its ebbs and flows it can take only minutes to root cause crashes in unknown code.
As a working example, we will take a look at crash-EXCEPTION_ACCESS_VIOLATION_EXECUTE-0x7676767.trace :

In Tenet, blue highlights are memory writes while yellow are memory reads
This trace ends with a crash and RIP set to 0x7676767. Very quickly we can see that this fuzzer generated testcase caused some type of stack-based buffer overflow. With Tenet we can literally scroll between memory read/writes made to the corrupted return address, or back and forth across breakpoints to observe the loop responsible for the overflow.
Cleaning up the decompilation as it pertains to this bug, we are left with the following:
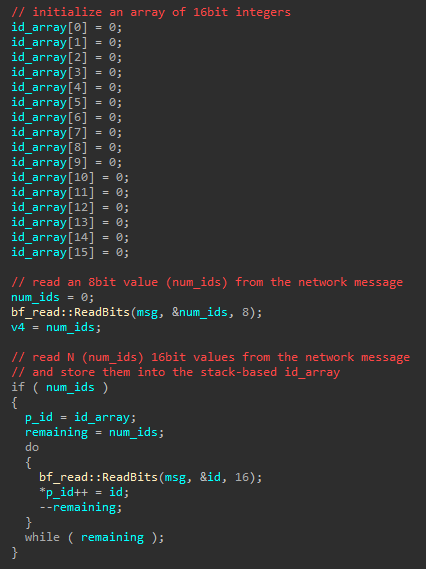
A lack of bounds checking allows the loop to write past the end of id_array
While handling this network message related to the game’s microtransactions, it will read an 8bit value num_ids out of the message (a bit buffer). It uses this value to determine how many 16bit ‘ids’ to read out of the message, storing them in the stack-based array id_array.
Since id_array only has 16 slots, the 8bit length value num_ids must not be greater than 16 or the code will continue writing arbitrary 16bit values past the end of the array. As all of this is remotely-originating data (i.e. attacker controllable) and no stack-cookies in sight, this is considered a critical vulnerability.
Tuning The Fuzzer
Having root-caused one vulnerability, we can now modify the fuzzer to precisely detect this malformed state of execution and ignore it in real-time. In this case, we want to kill execution if the 8bit num_ids parsed from the message is greater than 16.
Looking back at the assembly for the vulnerable code, we can see that the num_ids value should be in r14 at instruction 0x140244C1B just after it is parsed from the message bit buffer:
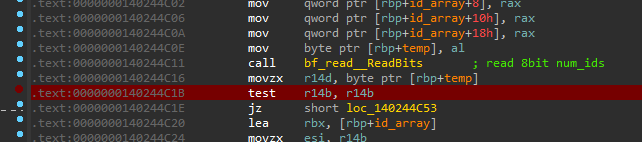
A suitable location to perform additional bounds checking against r14 (num_ids)
In the fuzzer, we can add logic to the Init(...) interface we implemented earlier to detect and ignore testcases that will explicitly meet the conditions to write past the end of the stack-based array:
bool Init(const Options_t &Opts, const CpuState_t &CpuState) {

  // stop execution if we reach the ret instruction in ParseMessages(...)
  if (!g_Backend->SetBreakpoint(Gva_t(0x1401F66C5), [](Backend_t *Backend) {
          DebugPrint("Reached function end\n");
          Backend->Stop(Ok_t());
      }))
  {
    return false;
  }

  // stop execution if the testcase will trigger the MTX stack smash
  if (!g_Backend->SetBreakpoint(Gva_t(0x140244C1B), [](Backend_t *Backend) {
        if (Backend->R14() > 16) {
          DebugPrint("Ignoring MTX vuln\n");
          Backend->Stop(Ok_t());
        }
      }))
  {
    return false;
  }

  // ...
}
This will prevent the bug from producing unnecessary ‘noise’ (crashes derived from the same bug) while enabling the fuzzer to spend time on more interesting testcases. If we rebuild what the fuzz and resume fuzzing, we should no longer experience crashes from this issue.
Conclusion
In this post, we demonstrated how to harness and fuzz the packet parsing code of a contemporary PC game using what the fuzz, a new open source snapshot-based fuzzer for Windows software. Over the course of three hours, the fuzzer discovered several unique crashes with concerning levels of severity.
By extending the snapshot-based fuzzer to generate Tenet traces, we performed root cause analysis on just one of the crashes, confirming its impact as a critical remote code execution vulnerability in the game client.